The Essential Guide to Testing Diamonds with the Diamond Selector II
For jewelers, pawn brokers, and consumers, verifying the authenticity of a diamond is the first step in any transaction. While there are many ways to inspect a gem, the industry standard for decades has been the Diamond Selector II. It is affordable, portable, and accurate—but only if used correctly.
Many users mistakenly believe that simply turning the device on and touching a stone will yield a perfect result. In reality, the Diamond Selector II is a scientific instrument that requires calibration. If the sensitivity is set too high, a piece of glass could register as a diamond. If set too low, a genuine diamond might fail. This guide will explain exactly how the technology works and how to master the calibration of the Diamond Selector II.
How the Diamond Selector II Works
To use the tool effectively, you must understand what it is actually measuring. The Diamond Selector II is a thermal conductivity tester.
Diamonds possess a unique physical property: they move heat faster than almost any other material on earth. When the probe of the tester touches a gemstone, it attempts to transfer heat into the stone.
- Genuine Diamond: The heat transfers instantly. The tester detects this rapid heat loss and signals a positive result.
- Simulants (CZ, Glass, etc.): These are thermal insulators. The heat stays at the tip of the probe. The tester detects no heat loss and signals a negative result.
Critical Step: Calibration and Sensitivity
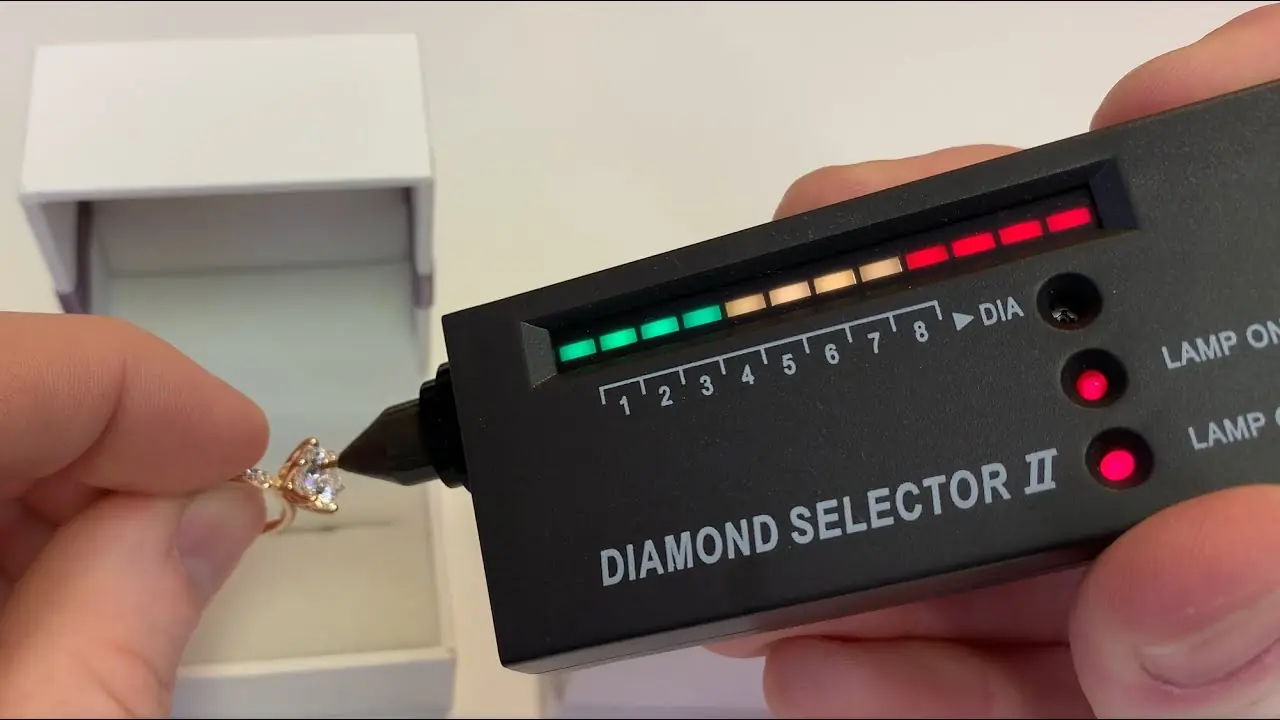
This is the most common point of failure for new users. The "Volume/Switch" dial on the side of the unit is not just for volume; it controls the sensitivity of the probe based on two factors: the size of the stone and the temperature of the room.
If you crank the dial all the way up, the probe becomes hypersensitive. It may register your own body heat or the ambient air as a positive signal, causing false positives on fake stones. Follow this rule of thumb for the "Level Meter" (the green lights) before you test:
The Golden Rule of Calibration
You must set the starting number of lit green bars before touching the stone.
- Large Stones (Over 0.60ct): These are easier to read. Turn the sensitivity DOWN. You should only see 2 or 3 green bars lit up before testing.
- Small Stones (0.05ct - 0.50ct): These are harder to read. Turn the sensitivity UP. You should see 4 to 6 green bars lit up.
- Temperature Adjustment: If the room is very cold, turn the sensitivity up slightly (one extra bar). If the room is hot, turn it down.
Step-by-Step Guide: How to Use the Diamond Selector II
Once you have inserted a fresh 9V battery and waited 30 seconds for the "Lamp on Ready" light to glow, follow this exact procedure:
- Clean the Stone:
This is not optional. Grease, makeup, or finger oils on the diamond can act as an insulator, blocking the heat transfer. Wipe the stone vigorously with a cloth before testing.
- The "Grounding" Grip (Crucial):
On the back of the Diamond Selector II, there is a metal strip called the Electricity Conductive Panel. You must touch this plate with your bare skin (fingers) while holding the device. This completes the electrical circuit required for the "Metal Alert" function. If you wear gloves or do not touch this plate, the device will not buzz if you accidentally hit the metal ring setting.
- Position the Probe:
Remove the protective cap. Hold the probe tip at a strict 90-degree angle (perpendicular) to the table or facet of the gemstone. Do not come in at a slant, as you risk touching the metal prongs or getting an inaccurate reading.
- Execute the Test:
Gently touch the tip to the stone. You do not need to press hard; slight contact is sufficient. Watch the level meter lights.
- Interpret the Results:
- Diamond: The LEDs will rise from the green zone into the red zone, accompanied by a rhythmic Beep-Beep-Beep.
- Simulant (CZ/Glass): The LEDs may rise slightly but will stay in the green/yellow zone. There will be no sound.
- Metal Alert: A continuous Buzzing sound indicates you have touched the metal setting, not the stone. Re-position the probe and try again.
Testing Loose Stones
If you are testing a loose diamond (one not set in a ring), you cannot hold it with your fingers, as your body heat will skew the results. Place the loose stone in the metal "well" of the provided Testing Platform. Hold the plastic platform with one hand (to keep it steady) and test with the other.
Limitations and Nuances
While the Diamond Selector II is the workhorse of the industry, it is important to know what it can and cannot do.
- The Moissanite Problem: Synthetic Moissanite conducts heat very similarly to diamond. A standard thermal tester like the Diamond Selector II will often identify Moissanite as a Diamond. To differentiate these, you need to check for double-refraction with a loupe, or use a "Multi-Tester" that checks for electrical conductivity as well.
- Black Diamonds: Black diamonds are conductive, but they are full of inclusions (graphite) which are electrically conductive. Sometimes, a black diamond will trigger the "Metal Alert" buzzer because the graphite conducts the electricity from the probe tip! Testing black diamonds requires patience and finding a clean spot on the surface.
- Battery Health: If the lights dim when the unit beeps, your battery is low. A low battery lowers the voltage to the probe heater, which can cause inaccurate results. Change the battery frequently.
When to Seek Professional Appraisal
The Diamond Selector II is an excellent screening tool. It tells you immediately if a stone is glass or CZ. However, because of the existence of Moissanite and Lab-Grown Diamonds (which test exactly the same as Earth-Mined diamonds on this device), a positive result is not the final word for high-value items. For definitive proof of origin or value, always consult a certified gemologist.
Conclusion
The Diamond Selector II is a powerful tool in the right hands. By understanding that it detects heat transfer, and by respecting the need for proper calibration and the "grounding" grip, you can filter out 90% of fake stones on the market instantly. Treat it as a precision instrument, keep the probe tip clean, and it will serve you faithfully for years.